
The early part of August is one of the few times during the academic year when things are relatively quiet. This year I’d booked two weeks of leave during that period but I wasn’t going away on holiday. For around six years, I’ve been planning to migrate the CADTutor forum from vBulletin to Invision Community Suite. In all that time, I hadn’t managed to find the time and, in truth, I’d been putting it off because although “migration” is easy to say, I knew it was going to be a long and complex task. This year I knew it had to happen. The versions of PHP and MySQL that the old forum software relied upon were coming to “end of life” and would no longer be supported. If I didn’t do it now, the forum would come to an end. So I dedicated two weeks of summer leave to sitting in front of a computer screen while I planned, prepared and managed the migration of 16 year’s worth of forum posts to a new platform.
Nothing that complicated can ever be perfect but with only a few minor glitches, I considered the migration to be a success. So it was with that at the forefront of my mind that I set off on what was my fifth and most likely my final visit to the Lakes in 2018. I had a few loose fell-ends to tie up and a couple of big walks planned and 4 days in which to reach a nice, round number of Wainwrights before the start of the new academic year.
On Sunday 26th August I drove north and stopped with Mum in Southport. The Monday was a bank holiday and I didn’t think travelling on that day, especially in the Lake District, would be a good idea. So I stayed over on the Monday too and then drove further north on Tuesday morning, stopping at my favourite Lakeland car park at Seatoller.
Tuesday
I set off east, back along the road towards Rosthwaite and then turned right opposite YHA Borrowdale to Stonethwaite. The last time I was at Stonethwaite, I was on the way to Sergeant’s Crag. On that occasion, the weather was damp, the cloud low and I turned left at the telephone box. Today, the weather was rather better; bright but not sunny and I followed the road, past the phone box to the campsite.
As this route was new to me, I decided to take a photograph as a record but when I tried to do so, my camera was dead. I could not believe what was happening at first. I’d charged the battery fully the previous day and everything had been OK. I cursed the fact that I’d left the spare battery back at the car and for a few seconds wondered whether I should walk the 2.5km back there until I remembered that I could take photos with my phone. So I decided to continue, knowing that I’d need to ration the photos because there was very little memory left on my phone. What a pain!

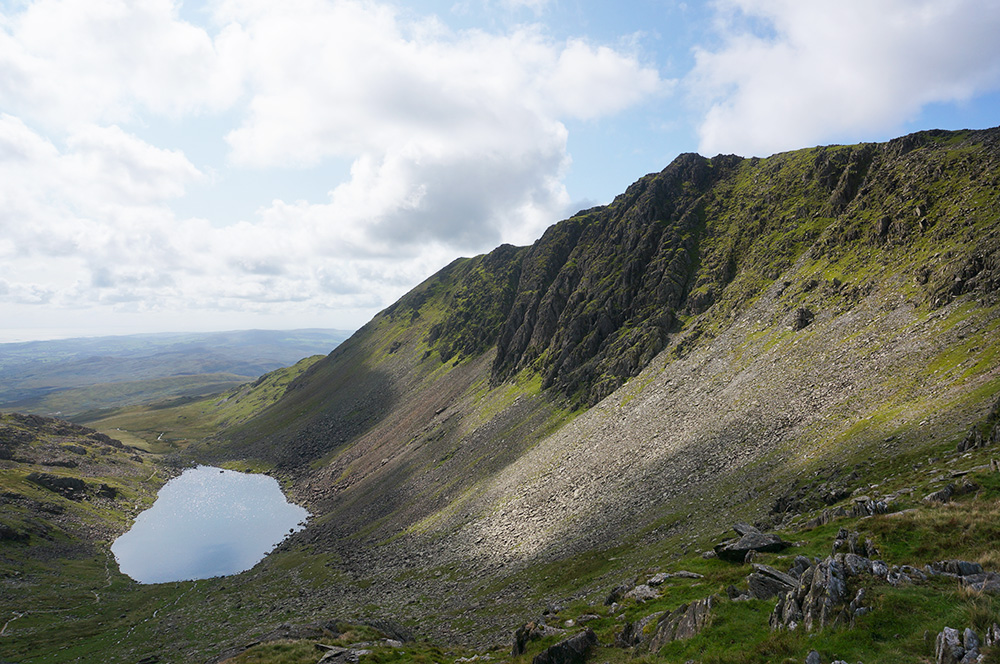
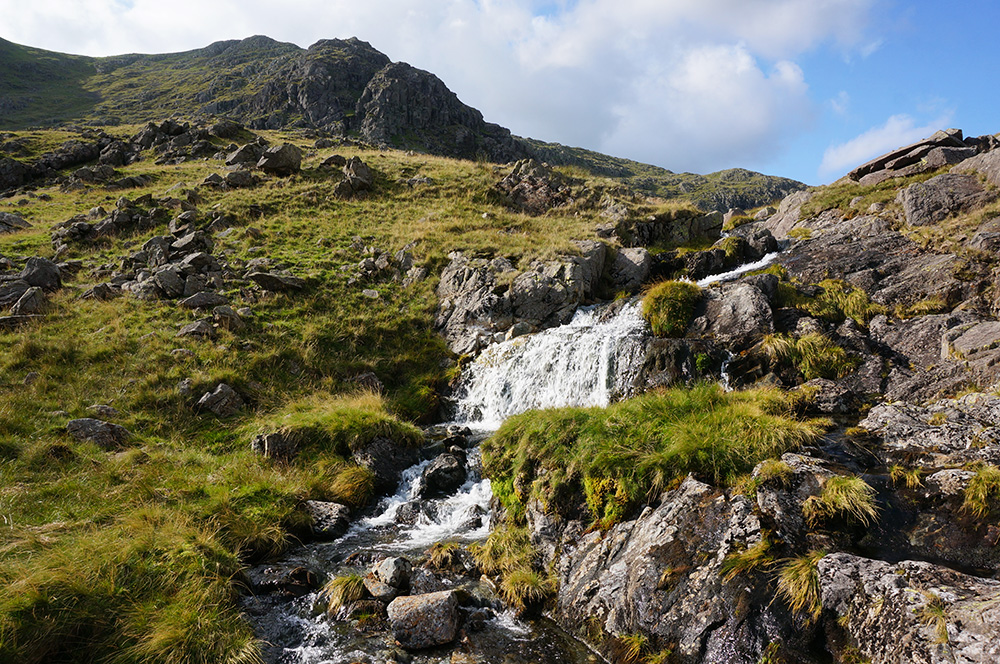
Opposite the campsite, there’s a gate which leads on to a steep climb alongside Big Stranger Gill. It’s a really pleasant climb through woodland on a path that is mostly pitched. As height is gained, there are some lovely views back into Borrowdale.
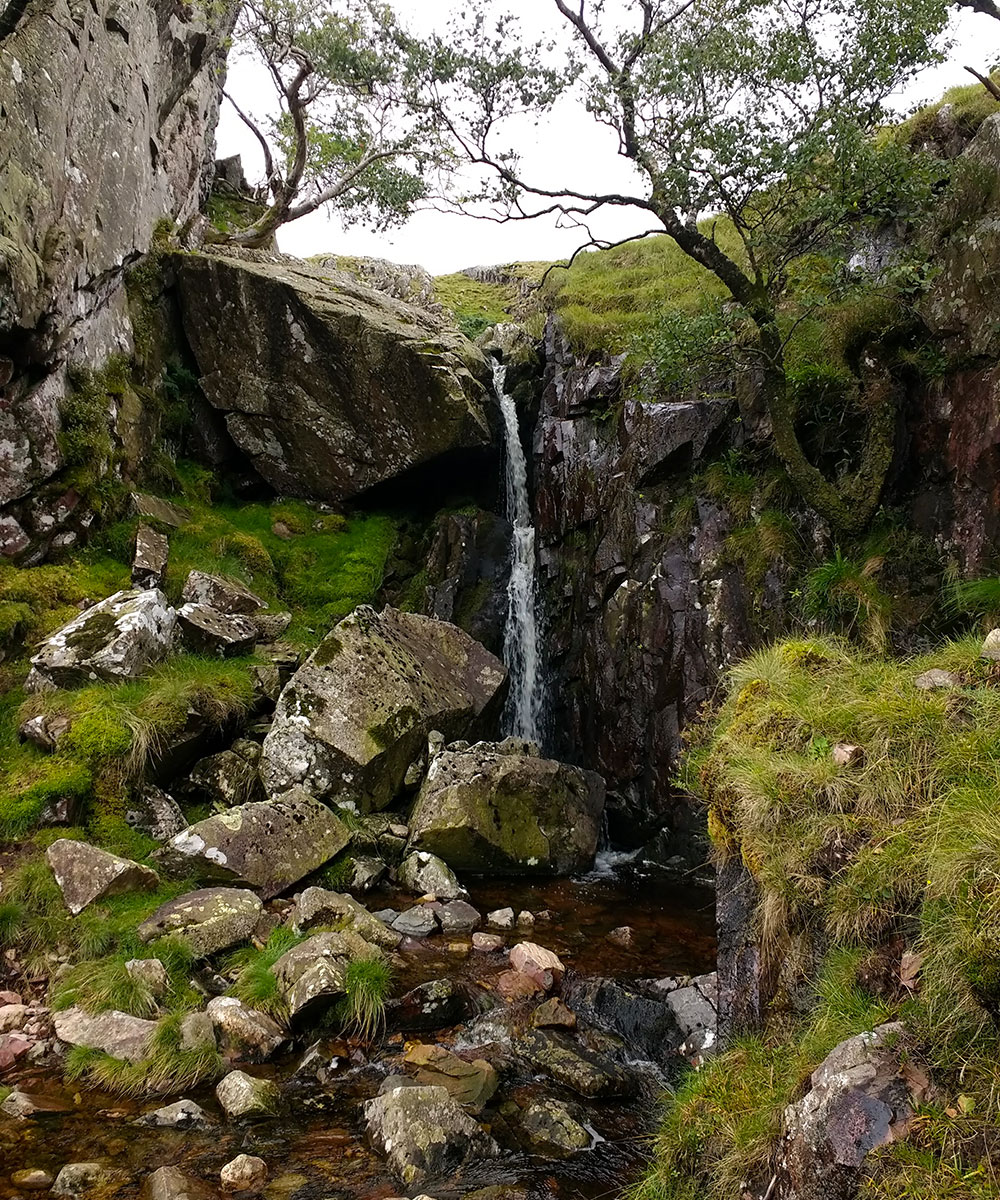
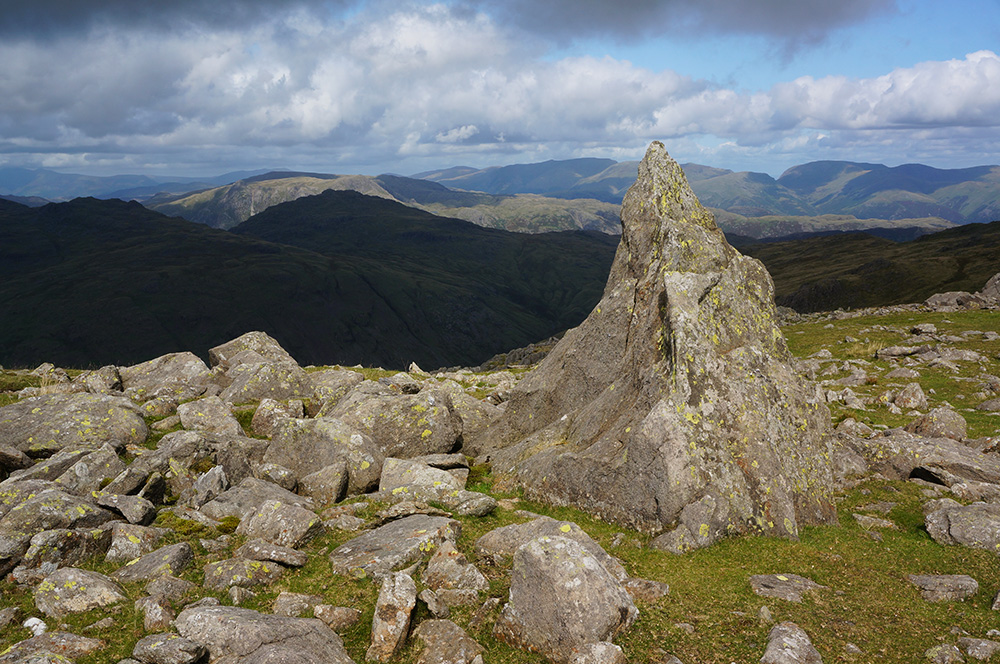
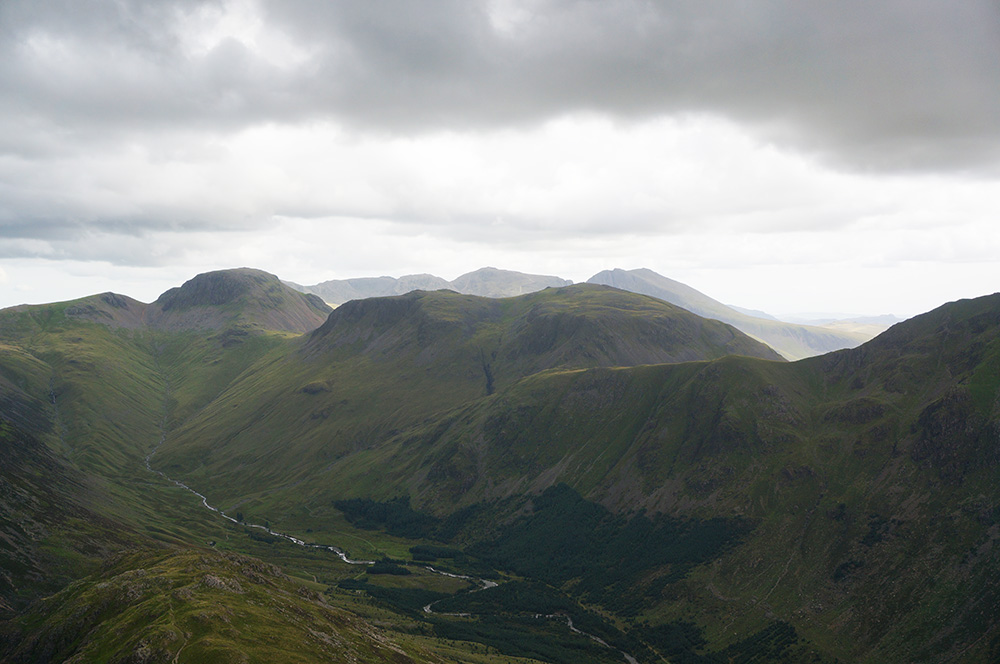
Eventually, the steep climb eases and the path follows the gill round to the west. There’s a lovely waterfall at the point where the path crosses the gill and a short climb gives way to a linear depression below the Bessyboot ridge. The path, now fainter, leads around the base of Bessyboot and to a short grassy haul up to the summit.
Once the summit is gained, it becomes clear why this spot was chosen as the “accepted” summit of Rosthwaite Fell; the forward location and the aspect are excellent, with wonderful views of Borrowdale to the north and a west to north-west arc of fells from Great Gable to Dale Head and High Spy. I paused a while to take it all in.
The next leg of the walk would be tricky. All the accounts of the route from Bessyboot to Glaramara suggest that navigation is difficult. Mark Richards, in his Fellranger guide says: “A less than orthodox ridge turns navigation into a challenge in misty conditions. Mountain Leadership certificate holders and entry-level Mensa candidates will enjoy the deviousness of what passes as a ridge path. Others, me included, have to concentrate, even on sunny days.”
I’d had difficulty plotting an obvious route on the map and although I had that route on the OS Maps app, it didn’t really make sense now that I was here. So, rather than follow my plotted route, I decided to follow the line of least resistance and look for likely paths. Fortunately, this strategy worked.
I descended from Bessyboot to Tarn at Leaves and rather than walk along the tarn shore as I had planned, I immediately climbed onto Rosthwaite Fell proper, following a faint but distinct path.
Concentration was definitely required as I picked my way to the east of Rosthwaite Cam and then swinging west around Gill Combe. Faint paths emerged and then disappeared along the way, forcing me to halt and take stock of my position. I was very grateful for the GPS on my phone and Mark Richards’ guidebook notes.
Eventually after what seemed much more than two kilometres, I found the Thornythwaite Fell ridge path and followed that to the summit of Glaramara. Rain was in the air and mist shrouded the surrounding fells. I crossed my fingers. hoping that Glaramara would remain clear.
There’s a steep but relatively straightforward scramble on the approach to the summit, which I managed without too much difficulty. I took my customary summit photograph with my phone and didn’t hang around as the rolling mist, which swirled over Great End and Great Gable, seemed to be moving towards me.
Rather than negotiate the scramble on the way down, I took a more circuitous western descent around and back to the Thornythwaite Fell route. I knew that once this path was found, I’d make it safely off the fell, even in a thick mist.
I didn’t need to worry. As I walked back to Seatoller, the sky brightened and the mist thinned. I returned to the car, knowing that I had tidied up a geographical anomaly in my fell-bagging record and that all the remaining fells lay to the south and west.
Wednesday
The weather on Wednesday looked perfect for walking; bright but not hot, broken cloud and not too windy and, most importantly, dry. Ideal for a big walk. Today I was going to do the Coniston Fells.

I had an early breakfast and left YHA Ambleside in good time, arriving at the main Coniston car park by the information centre, before 9am. I had considered saving some money by parking at the Walna Scar Road car park but since this was a circular walk, that would mean a steep climb right at the end. I decided that starting low and ending low was the best tactic, especially as this was going to be a long and tiring walk.
Shortly after 9am, I set off along the road and headed for the Walna Scar Road car park. The first section of road, alongside Dixon Ground, is very steep and didn’t make for a pleasant start to the day. However, further out from the town, the gradient eases and the prospect opens out.
The road up to the car park is metalled and there were a few cars there, this being a convenient start point for climbing the Old Man. Beyond the car park, Walna Scar Road is just a rough track. Four wheel drive vehicles could make it some of the way but there are a couple of pinch-points with rock either side, too narrow for any 4-wheeled vehicle. In any case, the road is a “restricted byway”, meaning that no motorised vehicles are allowed.
The road itself is ancient and at one time it was the main link between Coniston and the Duddon Valley. The highest point is at Walna Scar Pass and this is where I was headed. The intention being to take in Walna Scar en route to Dow Crag. Although Walna Scar only gets a mention in Wainwright’s Outlying Fells, it is very much one of Mark Richard’s Fellranger Fells and therefore on my bagging list. In fact, it is the highest of all the Outlying Fells and therefore a worthy destination.

This walk has a long outward leg with about 5km to the first top, 3km of which is along rough track. However, the gradient of this track, as with many of the old mining tracks I’ve walked, is relatively gentle. So height is gained easily over a distance and this morning, the further I walked, the better the weather became.
By the time I reached Torver Bridge (inexplicably labelled “Torver Brigde” on the OS 1:25,000 map), there was clear blue sky overhead. From there, I could see the track steepen and wind up to the head of the pass, with Brown Pike rising to the right. I stopped for a while to take in the place and listen to the tumbling waters of Torver Beck.
After the final steep switchback section of track, I turned left at the top of the pass and onto a grassy ridge. A short climb later, I was at the disappointingly small “cairn” of the rather unprepossessing Walna Scar. Why, I wondered, was this considered a worthy destination, there being plenty of better tops locally? At first, I was convinced I must be at the wrong place, but a quick GPS check told me otherwise.
From Walna Scar, I dropped back to the track and then crossed it, following the ridge up to the summit of Brown Pike, a far more worthy destination with its generous cairn and wind shelter, but not included in any of the lists as it is considered merely a shoulder of Dow Crag.

From Brown Pike, I followed the narrowing and increasingly rocky ridge to Buck Pike and then to Dow Crag, the first Wainwright proper of the day. From the underwhelming to the sublime. If Walna Scar was a disappointment, Dow Crag exceeded all expectations. What a fantastic place to be! The summit is a small, rocky cockpit; too small for a cairn, but in truth, it really doesn’t need one. It’s a natural summit with broken fingers of rock pointing skyward.
Views from the top are excellent, across Goat’s Water to Coniston Old Man and then north, along that ridge to Brim Fell, Great Carrs and Grey Friar. Here was my high-level route laid out in front of me and I took a while to study it.
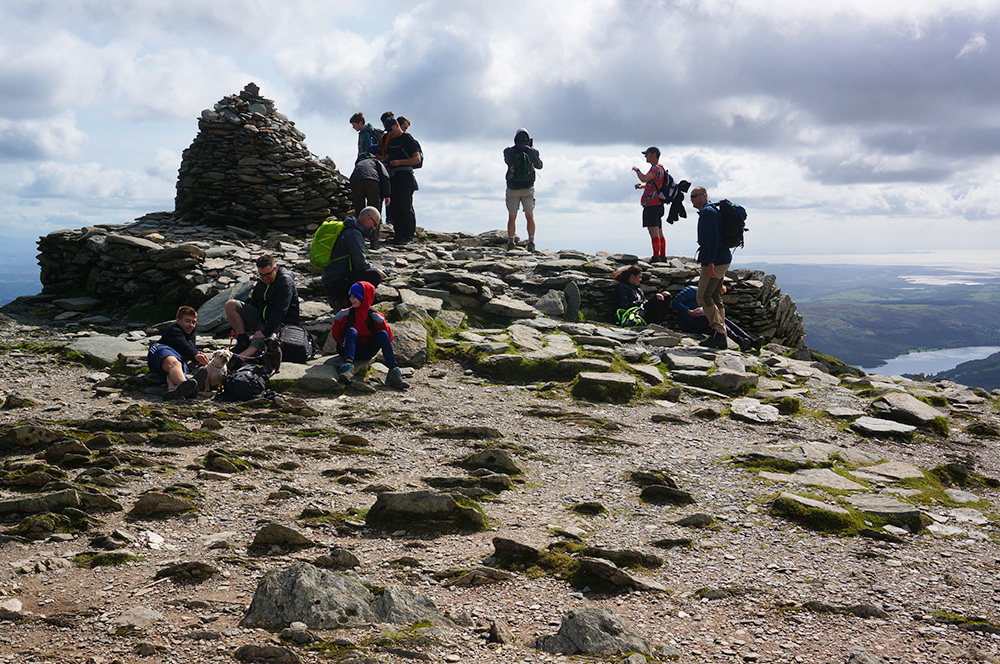
I had Dow Crag summit all to myself but looking across to the Old Man, I could see plenty of human activity at my next destination. Coniston Old Man is one of Lakeland’s most popular fells.

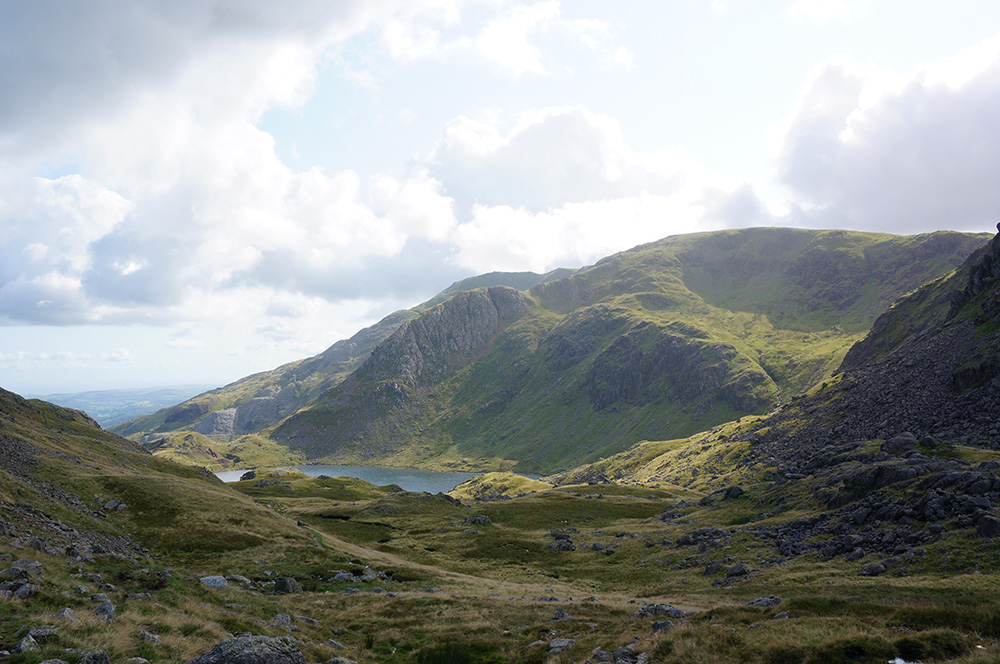
I left Dow Crag and, after looking back at its impressive profile, followed the ridge path down to Goat’s Hawse. From this location the full majesty of Dow Crag’s craggy face can be appreciated. Looking due south along Goat’s Water, Dow Crag’s dark rocky buttresses sit imperiously above a scree slope that runs down to the water.
Goat’s Hawse is a busy intersection, it’s where the Goat’s Water tourist route turns right up to Coniston Old Man’s summit after the steep climb from Goat’s Water. Most walkers take the opportunity to rest a while before the final slog to the top and on this beautiful day, there was a party atmosphere about the place.
I climbed the eroded path with dozens of other walkers and soon made it to the crowded summit. Of all the Lake District summits visited so far, this was by far the busiest. Only Fairfield comes close. The caveat being that I have yet to visit Scafell Pike. I had become used to having these places to myself and certainly resented my fellow tourists being there. However, it was now 12.30pm so I decided to accept the hubbub and found a perch for an early lunch break. As soon as I’d eaten, I moved off, glad to be immediately alone again.
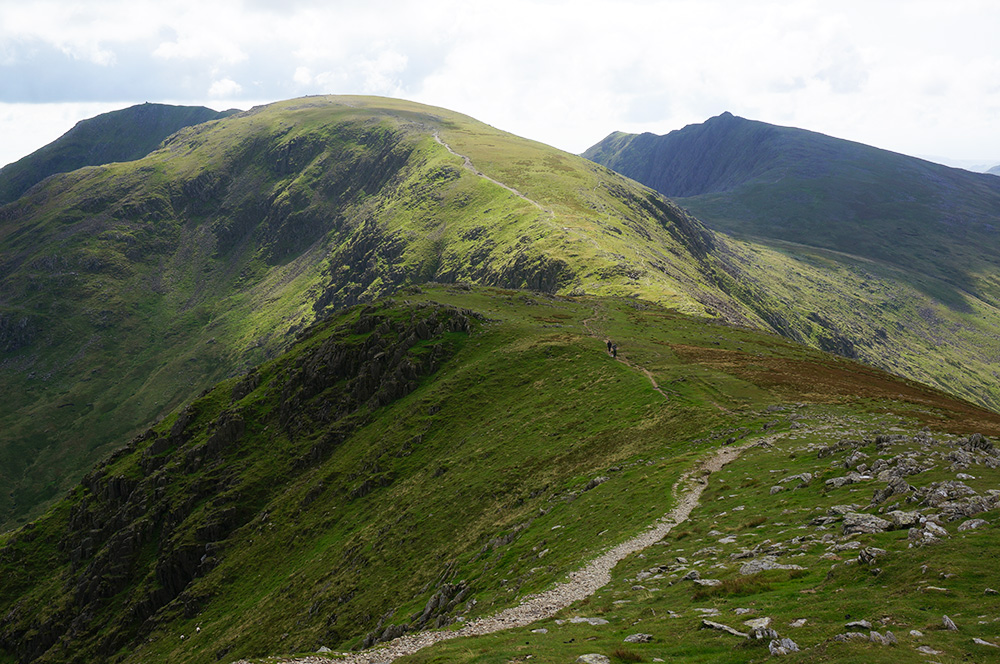
Brim Fell is no more than 1km from Coniston Old Man and a simple walk along a gentle incline. Where it not for the rather impressive conical cairn, it’s debatable whether I’d have known I’d made the summit at all. The summit itself is no more than a stony field. As Mark Richards puts it, “There are summits and there are summits: Brim Fell needs a cairn, Dow Crag doesn’t.”

Now away from the crowds, I fancied a sit down at Brim Fell but there was nowhere to sit, so I continued along the ridge to Levers Hawse and looked for the path that would take me around Calf Cove and to Grey Friar.
I could find no trace of a path leading in the direction I wanted, so I set off across open fell, hoping that a path would emerge. In time and after a deal of awkward contouring, I came across a path that took me where I was headed. This has happened to me a number of times during my fell walks and I’ve become used to the fact that sometimes you simply have to have faith that there is a path somewhere and that if you take a logical line from point A to point B, you will come across it.
Eventually, my faint path swung west to join the much more distinct path between Grey Friar and Great Carrs.
Grey Friar summit is a good one; rocky, expansive and full of interest. There are several cairns but the main summit cairn is not in question, a small pile of rocks atop a rock platform. In fact, the actual summit is possibly the least interesting part of the plateau. In contrast to Dow Crag, the rock here is light in colour, giving the place an airy feel. However, the best features of this summit are the views to west and north, which are framed between jagged rock teeth. To the west, the Scafell range is prominent and to the north, there is the broad sweep of Crinkle Crags, Cold Pike and Pike o’Blisco with Skiddaw in the distance.
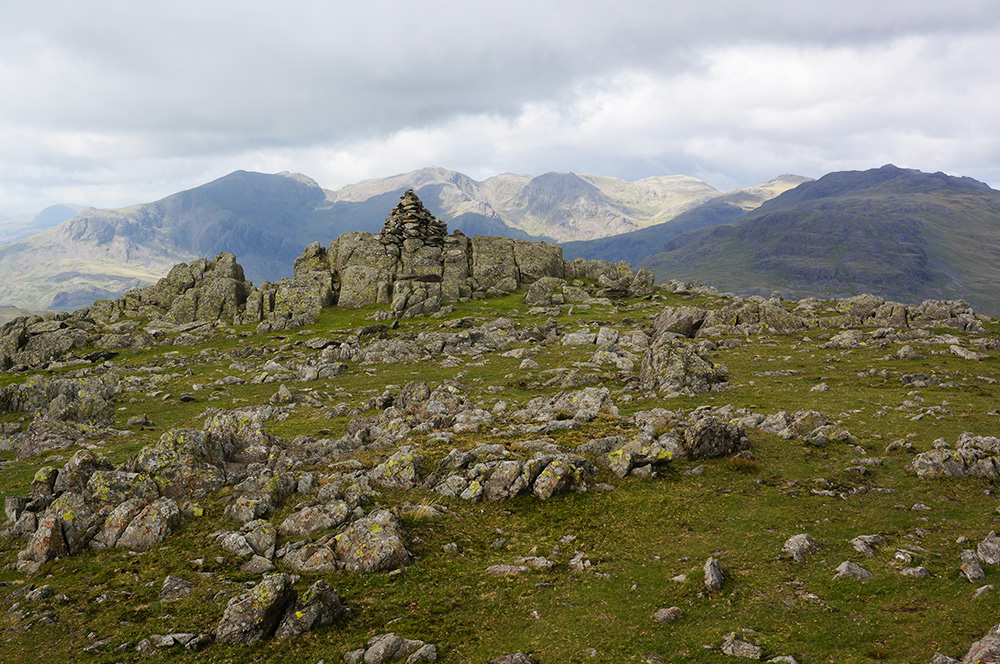
I tallied a while in this wonderful place, yet another summit I didn’t really want to leave. However, I still had two more Wainwrights to visit, so after some time spent photographing the northern cairn and Matterhorn Rock, I set off back on the track down and towards Great Carrs.
The most notable feature of Great Carrs summit, and the most poignant feature of the entire walk, is the crash site of Halifax LL505, marked with a cairn and a memorial cross. The aircraft’s undercarriage remains as part of the dedication to those who lost their lives.
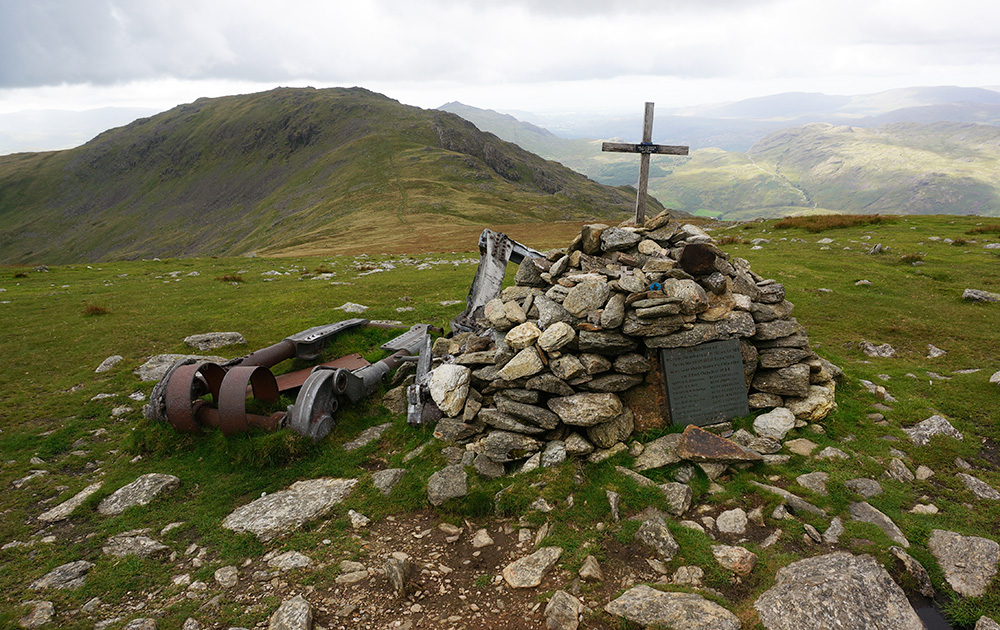
The summit itself boasts a fine cairn sitting on a rocky outcrop, a fitting terminus to the narrow, grassy ridge.
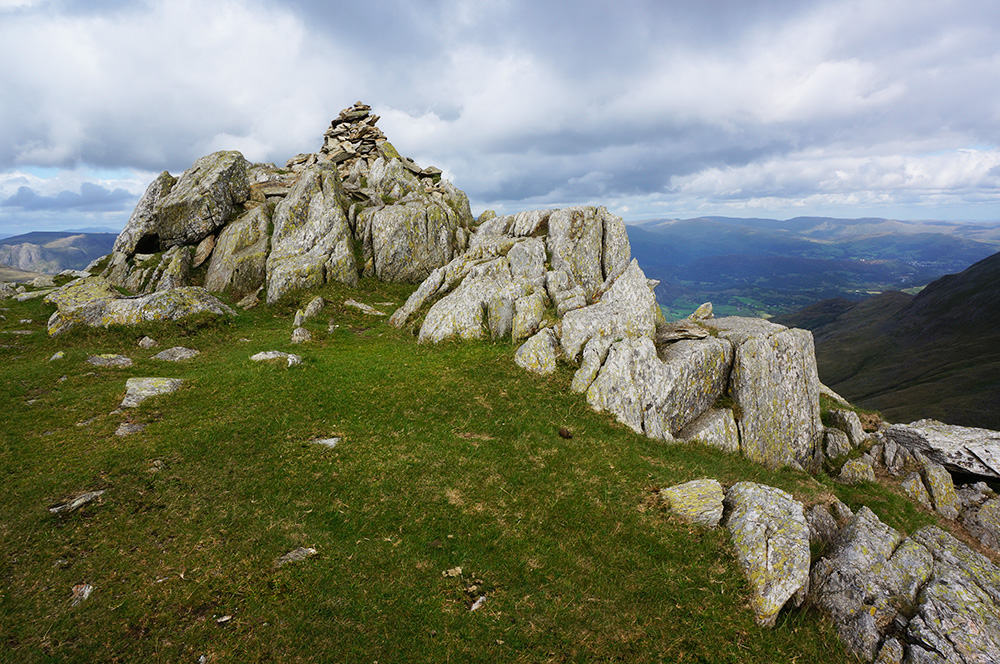
The final top of this excellent walk was Swirl How, just a few hundred metres around the edge of Broad Slack. From the summit, there’s an expansive view back to Great Carrs and to Bowfell beyond. It’s another rocky top with a well-proportioned beehive cairn and the highest point on the walk, being just one metre above Coniston Old Man.
From Swirl How the route follows Prison Band down to Swirl Hawse. As there was no need to visit Wetheralm, I turned right at the hawse and followed the path on the descent to Levers Water. This is a lovely route and as I neared the reservoir, the clouds parted once more and the full sun shone down. My attention was caught by the sound of crashing water and I left the path to sit at the base of a beautiful cascade with a fine view over the water. I had made remarkably good time, it was not yet 4.30pm so I decided to spend some time at this lovely spot.
After 20 minutes of quiet contemplation, I crossed back to the path and made my way down to the shore of Levers Water. The route is excellent and follows the rocky edge of the water with the reservoir surface sparkling in late afternoon sunshine.
From the weir there’s still a 3km walk back into Coniston with plenty of interest along the route through the old copper mines.
All-in-all, this had been an excellent day-walk of 20km and taking in six new Wainwright tops. Best of all, the weather had been perfect. Sunny but without the sapping heat of my July walks.
In fact, the only downside was that my toe joints were, once again, becoming quite painful. Very disappointing because otherwise, my new boots were performing really well.
Thursday
Thursday looked like another fine day for walking but I had a long drive to the start point at Bowness Knott on Ennerdale Water. This walk, along the High Stile ridge would add another five Wainwrights to my total.
I arrived at the Bowness Knott car park at 10.30am after a slightly confusing drive (I only took one wrong turn) and feeling rather unsettled. Despite the remoteness of this spot, there were a dozen other cars already parked up.

I’d decided to give my boots a rest and, since the weather looked good, I wore my walking shoes instead, hoping these would put less pressure on my toe joints. I set off back up the road, looking for a footpath on the right that would take me up alongside Rake Beck and although my toes were still sore from the previous day, my shoes felt comfortable.
The walk I was doing is detailed in Vivienne Crow’s excellent Lake District High Level and Fell Walks, and with the aid of that book, I easily found the start of the walk proper.
The climb to Great Bourne summit is a tough one. There’s an initial steep section across bouldery heather and bracken moor before the route turns left to follow the beck up an even steeper section via a mini ravine. Hands are most definitely required as the path twists and turns between rocky outcrops.
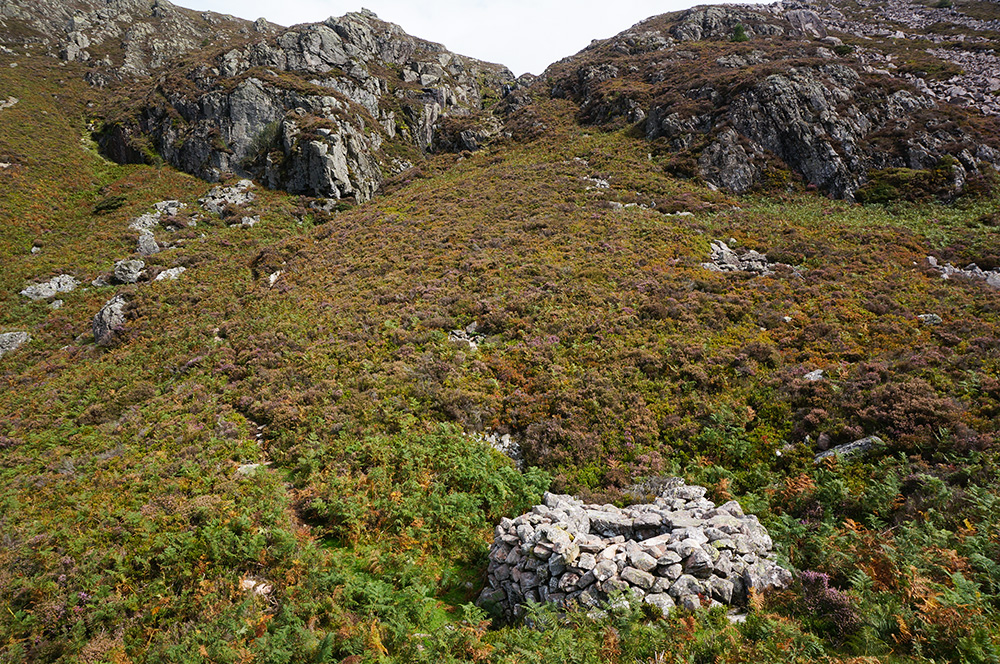
On the way up there’s a convenient resting point at a goose bield, effectively a fox trap. The interior is conical and smooth so that once a predator is inside, attracted by a dead goose, it can’t escape. It’s a beautiful piece of work, worthy of an artist like Andy Goldsworthy and a reminder of the farming history of this part of the world.
Eventually, a plateau is reached and after another few hundred metres, the confusing bouldery top of Great Bourne is gained. Confusing only because the summit triangulation column cannot be seen on approach and some circling of the rocky dome is required before a clear route is found.
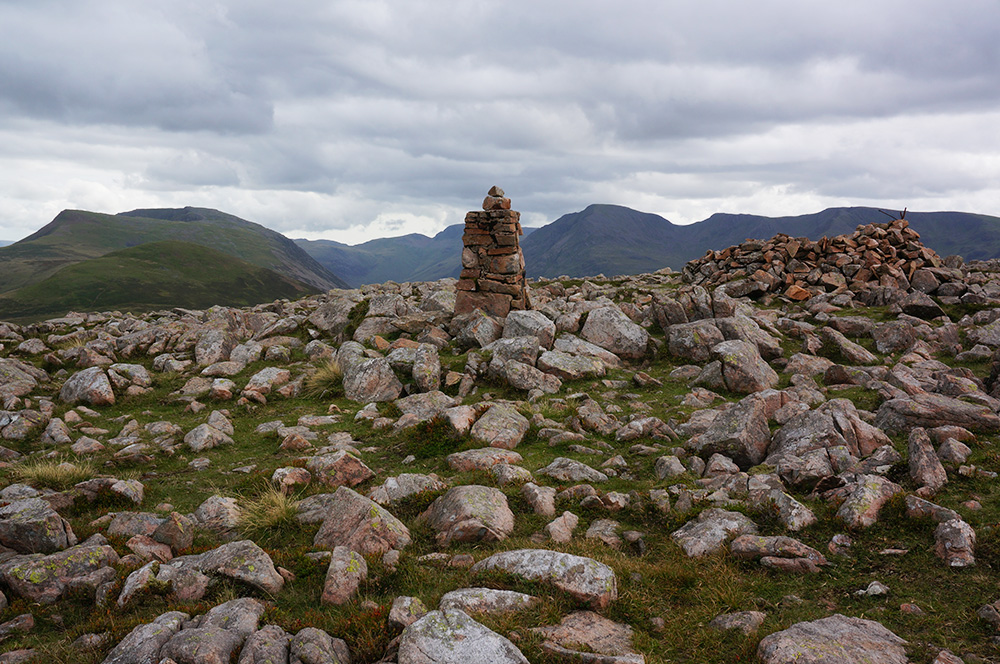
The top is very red. Pink granite boulders, some of which are oxidised, give the place a very strange and slightly eerie atmosphere.
From the top, a path descends steeply, following a fence to an area of open moorland. Crossing a few dips and hollows, the path eventually begins to rise and then climbs to the top of Starling Dodd.
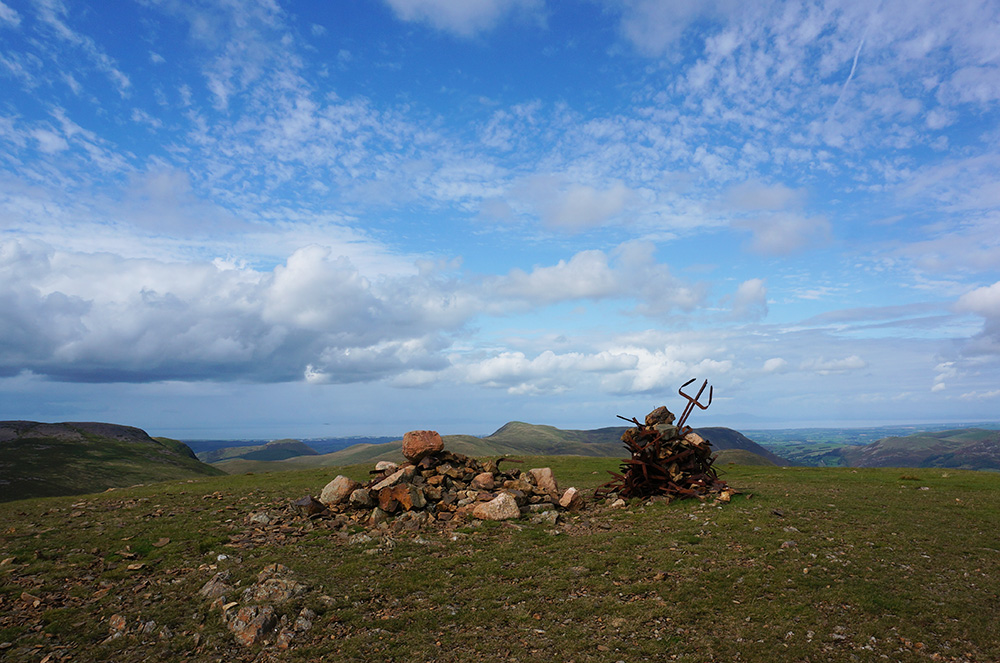
This place is also a little spooky, with its cairn of twisted metal but the open aspect gives it a completely different feeling to that of Great Bourne. So much so that I decided this would be a good place for lunch. I’d arrived just after 1pm and although there wasn’t an obvious place to sit, I found a spot with a good view and settled down on the springy turf.
From Starling Dodd, I could see the next two tops, Red Pike and High Stile and the clear ridge path linking the two with my current position. Navigation was not going to be a problem here!
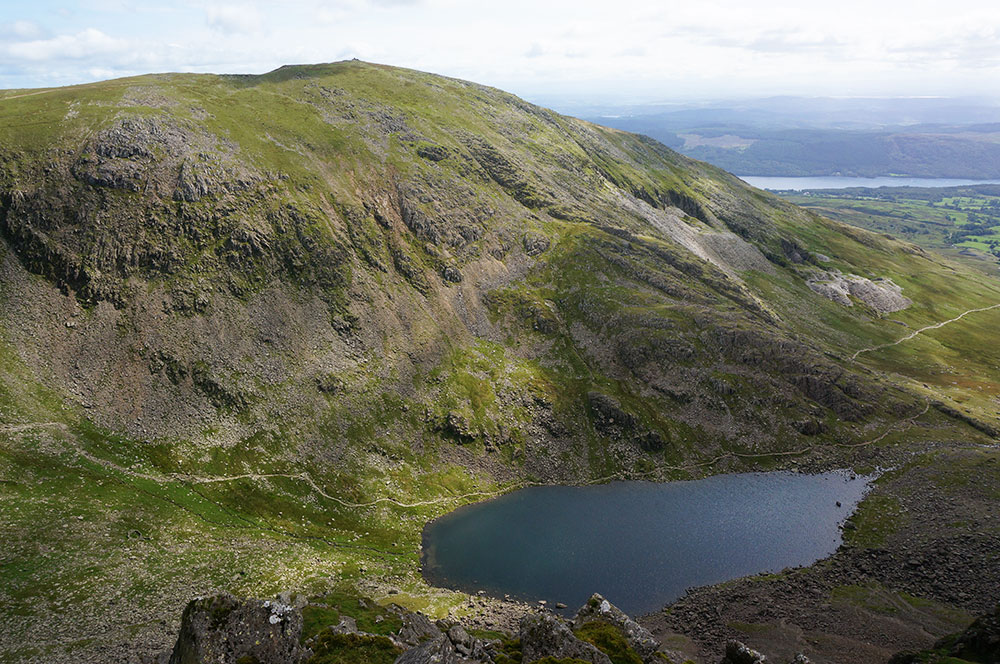
The 2km walk to Red Pike is pretty straightforward save for a steep climb just below the summit. It’s a popular top and there were a few others there when I arrived. They had obviously come up on one of the busy routes from Buttermere.
True to its name, Red Pike summit is, well, red. Formed of shattered, oxidised rock that gives its colour to the thin soil.

From the top, there are excellent views down to Buttermere and across to the Grasmoor massif. By now there were plenty of clouds in the sky and pools of sunlight fell on the surrounding hills and valleys as those clouds broke.
After some time reacquainting myself with the north-western fells, I moved on and headed for High Stile and the highest point of the walk.

The High Stile summit is an odd one, principally because there is, what looks like an obvious top on the ridge-line with a rocky outcrop and a decent cairn. This is the top that attracts most visitors. However, the Ordnance Survey suggest that the actual summit, one metre higher, is on a short promontory at right-angles to the main ridge route. And the confusion does not stop there. The promontory has a large and well-built cairn, which the casual observer may conclude to be the actual summit. Meanwhile, a small and rather unassuming cairn marks the actual spot. Only with the use of GPS could this be determined.
For those who care about such things, and I count myself among those nerdy ranks, identifying and visiting the correct summit spot is important.

Having satisfied myself that I had both of High Stile’s summits in the bag, I continued south-west to High Crag.
This section of the ridge is narrow and rocky with steep drops to the north-east over Combe Crags and down into White Cove. It’s a spectacular route and worthy of some care.
Eventually, High Crag summit comes into view, backed by a skyline including the bulky dome of Great Gable. There’s no confusion here about the summit. There is just a single cairn.
I’d arrived at High Crag just before 4pm and although the sky was still bright, cloud was thickening and it looked like rain might be on the way. So I spent little time there and started my descent down Gamlin End.
As it turned out, this was the most difficult and unpleasant section of the walk. The “path”, if you can call it that, is seriously eroded on the upper slopes with the result that walkers have no choice but to negotiate a very steep section of small, loose scree. This is one of the few times I wished I’d had walking poles.
Slowly and carefully I made my way down. Further on there have been some attempts to stabilise the scree and there are some sections of pitched steps but, in general, this is a difficult descent.
Eventually, the path levels out before rising again over Seat and then dropping into Scarth Gap. At this point, I thought, very briefly, about taking in Hay Stacks. Although a steep climb, the top was tantalisingly close. However, I’d already decided that this should be my final Wainwright, the 214th and in view of the darkening skies, I put Hay Stacks out of my mind and turned right, down towards the Ennerdale forestry road.
As I descended along a clear path, the sky darkened and by the time I reached the road, it was raining. I still had over 9km (6 miles) to walk back to the car. I put on my new waterproof jacket, pulled up the hood, put my head down and marched as quickly as the rough track would allow. It took about two hours and by the time I neared Bowness Knott car park, the rain had stopped, the sky lightened and there was even some evening sun. I arrived back at the car at quarter to seven, I’d been walking for over eight hours.
Friday
Friday’s walk required a trip to Eskdale. I headed for Jubilee Bridge at the western end of the Hardknott Pass, knowing that there was unlikely to be a parking space there. Fortunately, there was plenty of verge parking and I found a space a couple of hundred metres before Jubilee Bridge.
It was another beautiful day. A bit warmer than the day before but still not as energy-sapping hot as July. I made sure I had plenty of water with me and set off to find the bridleway that would lead around Harter Fell and get me close to Green Crag.
I’d left my boots behind for a second day as my feet were feeling a lot better in shoes but I wanted to make sure yesterday wasn’t just a fluke.
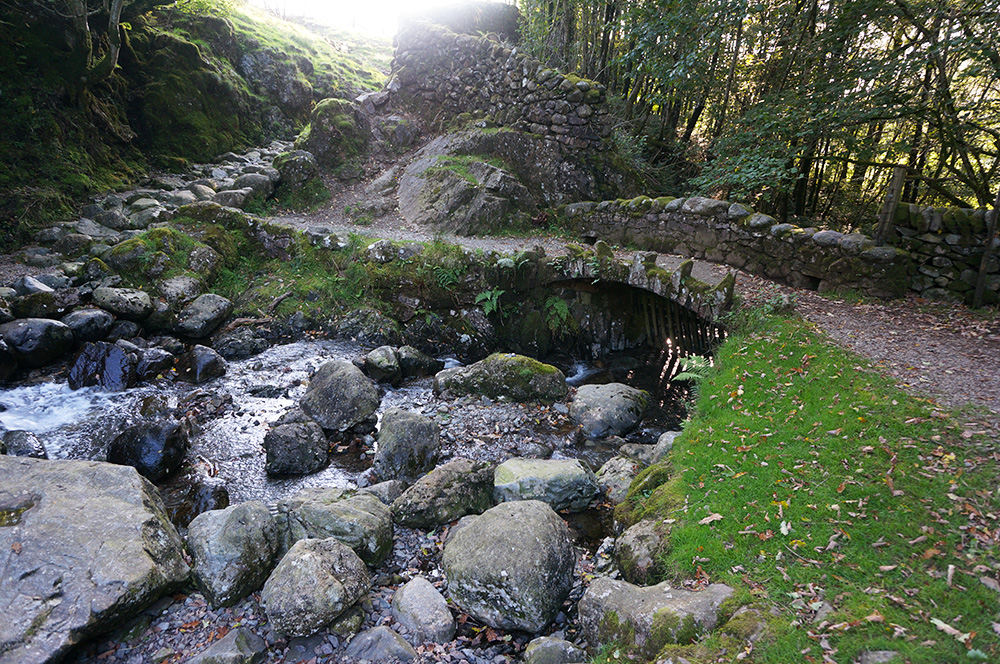
In my mind’s eye, I imagined Jubilee Bridge to be a crossing of the road over a substantial beck. In reality, this turned out to be a tiny stone-built bridge over a small stream at the start of the bridleway. Although insubstantial, it was thoroughly charming.
The first section of bridleway rises steadily at a comfortable gradient and I soon had wonderful, sunny views over Eskdale.
After about 1km, the track swings south and steepens to follow Spothow Gill before levelling out again. After another kilometre, I was at the forestry gate, the point where my route departed from the track.
My objective, Green Crag, lay to the south-west of my current position, about a kilometre across Ulpha Fell, with no obvious path or even topographic trend to guide the way. I took a little while to double-check my location and checked the guidebook notes before setting off across hummocky, open fell. As is often the case, I came across what appeared to be a faint path leading in the right direction, so I followed it.
The ground was wet under foot and the path, no more than trampled grass, seemed to be taking a diversionary route around the worst of it, which was a good sign.
Eventually, I arrived at the saddle between Crook Crag and Green Crag and the ground became firmer. I took a left towards Green Crag but, not before marking the junction with a large stone so that I could find the same point on my return.
Green Crag summit is a lovely, tranquil place and being relatively remote, there’s little chance of bumping into a fellow walker. As far as I could tell, there was no obvious path to this place from any direction.
Harter Fell, my next destination is 2km to the north-east and it’s dark, spiky dome looked impressive from here as the sunlight and shade played over it’s bulk.
I spent some time in this lovely place, just being alone.
I half-considered making a line for Great Worm Crag; it looked deceptively close in the clear air but the map told me it was over 1.5km away. I didn’t need an extra 3km round trip today so I let it be.
Reluctantly, I climbed down from Green Crag summit and found the stone I’d placed where my return path started.
Following the same route on the way back was almost impossible. Subsidiary paths appeared to left and right and before I knew it, I was obviously on a different route. I retraced my steps hoping to find the point where I’d gone wrong but it soon became clear that that was futile. Instead, I fixed on my objective, and headed towards it.
It took a while to find a way back, avoiding heathery banks and damp ground, but eventually I arrived at the gate to the forestry plantation. I was thankful for good weather. In mist, this traverse would have been almost impossible.
From the gate, I set off up the steep bank, keeping the fence on my right. Initially, there was no sign of a path, let alone a “clear path” but I kept faith with my trusty Fellranger guide and eventually, a path did appear.
The climb to Harter Fell is mostly steep with few breaks of slope. However, I was pleased to be on firm ground after the damp tramp over Ulpha Fell.
Finding a route to the summit was not as straightforward as it seemed and it took a little while to work out what was what. Wainwright obviously felt the same way and thought it worthwhile providing a plan of the fell top for reference.
The actual summit of Harter Fell is a massive rock outcrop with near-vertical sides. I attempted a climb but gave up when I realised that getting down might be even more difficult than going up. Instead, I settled for the “official” summit, an Ordnance Survey, stone-built triangulation column.
The views here are excellent so I found a comfortable place to sit for a while with the Scafells, Esk Pike and Bowfell before me and rewarded myself with a snack.
I became conscious that today would most likely be my last day in the Lakes this year and I determined to wring out every last ounce of spirit-lifting goodness.
Eventually it was time to press on. I still had one more Wainwright to bag and I crossed my fingers that it would be a good one. I headed for Hard Knott.
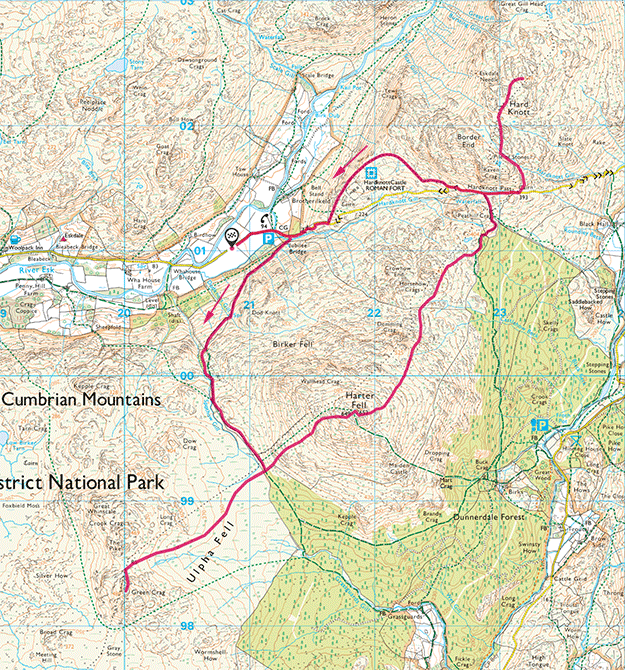
It seemed a long way down from Harter Fell to the Hardknott Pass and the route wasn’t always clear. It didn’t help that the road cannot be seen but the general direction was never in question as Hard Knott itself is in view most of the way.
After a few twists and turns, I made it to the road and then set about finding the start of the route to Hard Knott summit. Fortunately, this is marked by a large pile of stones at the roadside and is difficult to miss.
From the cairn to Hard Knott summit is only 1km but the route is one that never allows the walker to see the summit until you are almost upon it. It’s also one of those walks where numerous intermediate summits present themselves, fooling the unsuspecting walker into thinking they have achieved their goal only to realise, moments later, that there is yet another, higher summit further on.
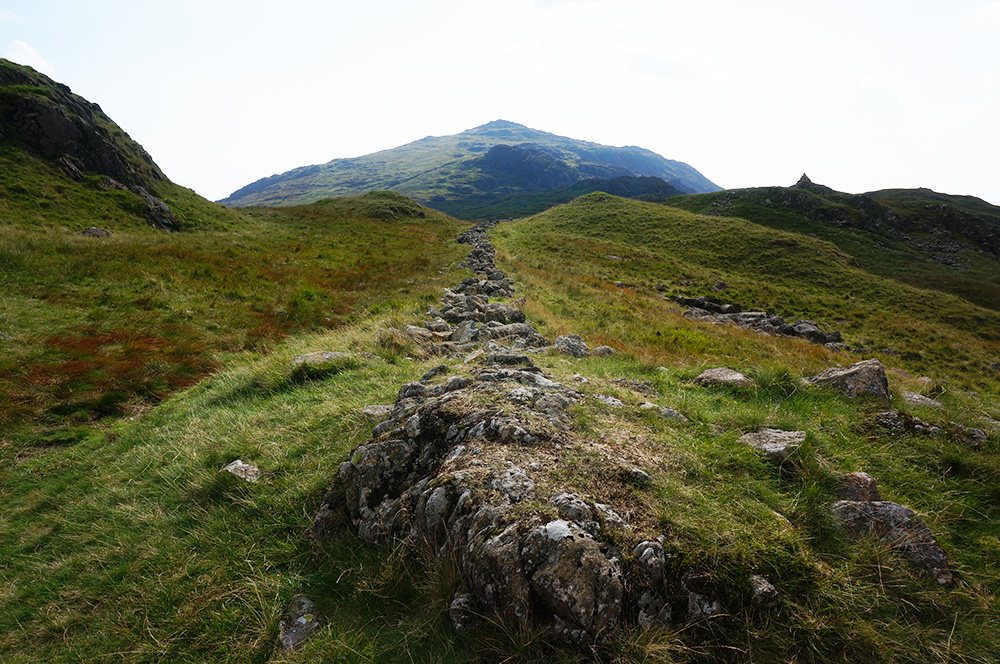
In truth, it’s a bit of a frustrating walk at the end of a long day in the fells. However, this particular summit turned out to be well worth the frustration and the tired legs. Wow, what a view!
Having now spent plenty of time in the Lakes, it’s easy to forget how special the place is. Stunning views become the norm – “hey look, another stunning view”. This one was different. The view from Hard Knott is in a different league. Wainwright says “The view of Scafell and Upper Eskdale is renowned”. I say it’s “bloody marvellous”.
The view north includes an amazing arc of the biggest fells in Lakeland, starting in the north-west with Slight Side and continuing left to right with Scafell, Scafell Pike, Great End, Esk Pike, Bowfell and Crinkle Crags.
Of course it helped that the weather was fine, that the late afternoon light was golden and the low sun was picking out the terrain in a confetti of light and shade. Some late summer grasses had turned to straw and others to burnt orange. The distant mountains were caught in a blue haze. This was a natural firework display. What a stunner!
I felt privileged to be in this place at this time and, yet again, I had it all to myself. It was a fitting end to my fourth season of fellwalking. Naturally, I spent some time drinking it all in and thinking about the (almost) unbearable lightness of being there (with apologies to Milan Kundera).
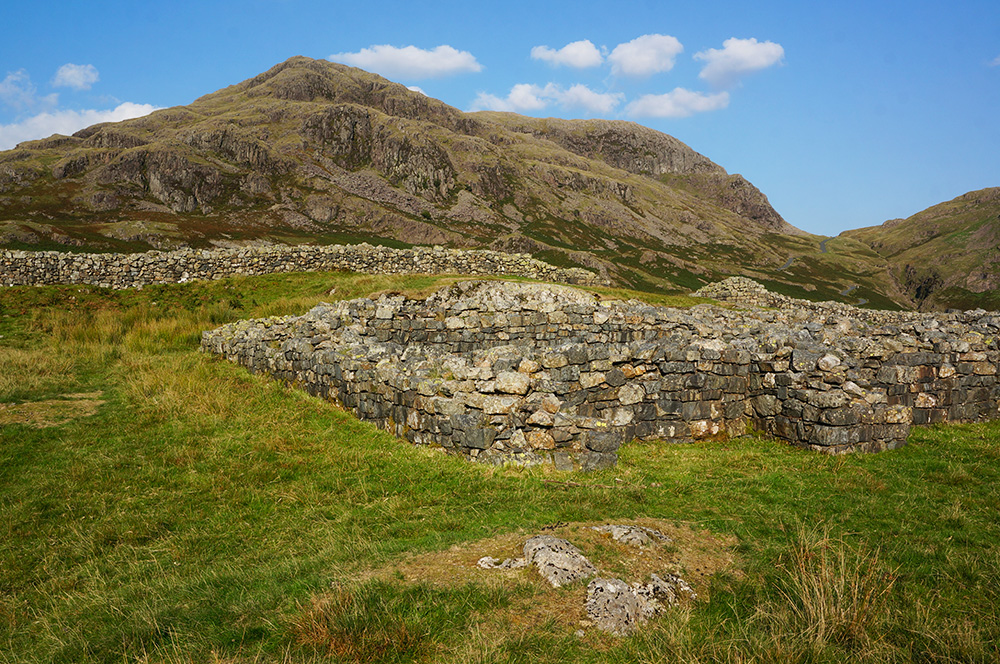
I returned to the car via the remains of the Roman fort and spent a little while wandering around the stones. Of course, I didn’t want to leave and was spinning it out as long as I could.∗
28th August 2018
Rosthwaite Fell (Bessyboot) (551m)
Glaramara (783m)
29th August 2018
The Coniston Fells
Walna Scar (621m)*
Dow Crag (778m)
Coniston Old Man (803m)
Brim Fell (795m)
Grey Friar (772m)
Great Carrs (788m)
Swirl How (804m)
30th August 2018
The High Stile Ridge
Great Bourne (616m)
Starling Dodd (635m)
Red Pike (Buttermere) (755m)
High Stile (807m)
High Crag (744m)
31st August 2018
An Eskdale Trio
Green Crag (489m)
Harter Fell (653m)
Hard Knott (552m)
* Fellranger Fell
After four fantastic days of walking I had added 16 new Wainwrights to my total, which now stands at a respectable 194, a nice round number and leaving just 20 to complete the round next spring.
Kit notes
By now I’ve refined my kit and there’s little else to add that I don’t already have. However, I didn’t have a decent waterproof jacket and had been using a relatively cheap Berghaus jacket I’d bought not long after I started walking in the Lakes. This is fine for the odd light shower but is not good in a downpour, as I discovered to my cost when the pockets filled with water and I destroyed my lovely Google Nexus 5 phone. Neither did it perform well in high winds, the material was just too light. So, I now have a Mountain Equipment Quarrel. This is the first Gore-Tex jacket I’ve owned and it performed really well on that long walk in the rain along Ennerdale. I also appreciated being able to access the pockets while wearing a backpack. All-in-all, an excellent upgrade.
My beautiful Meindl Vakuum boots started the season so well and were a welcome relief from my old boots but towards the end of the summer, they began to hurt my feet. It looks as though I may need to find something different for next year. A real shame because the quality of these boots is excellent.